No products in the cart.
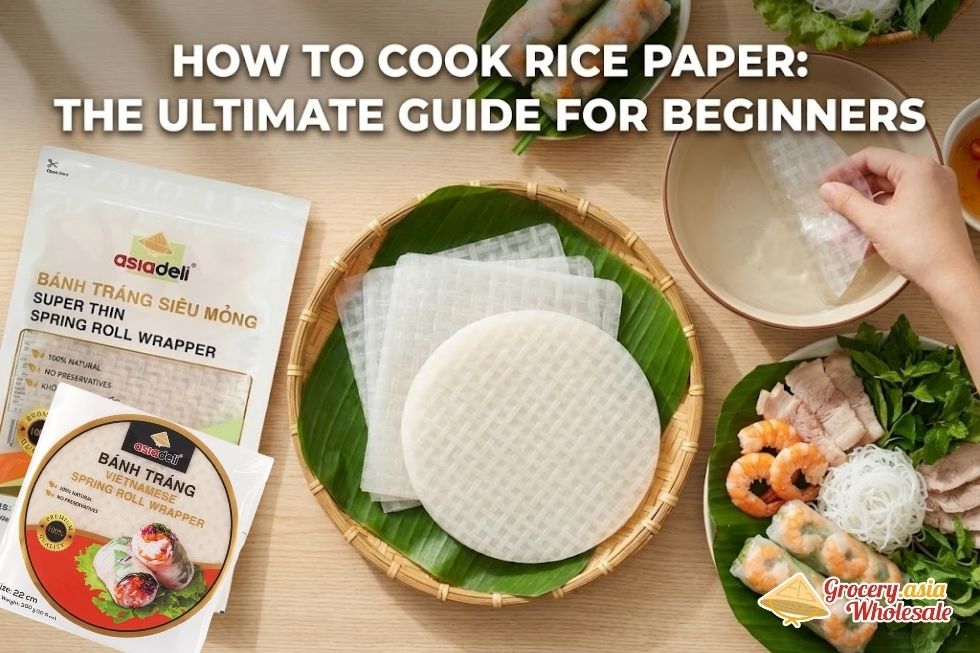
Asiadeli, Asiadeli Rice Paper
How To Cook Rice Paper: The Ultimate Guide For Beginners
10
Jan
Jan
Rice paper stands as one of Asia’s most versatile cooking ingredients, transforming from brittle sheets into pliable wrappers through simple hydration techniques.
Modern innovations like super-thin varieties have eliminated traditional preparation challenges, making rice paper accessible for everything from fresh spring rolls to crispy fried snacks and creative fusion dishes.
Key Takeaways
- Master hydration techniques by using cold water for beginners (safer handling) or warm water for experienced cooks (faster preparation), with each sheet requiring just seconds to become workable
- Choose the right rice paper variety based on your recipe – small round sheets for delicate preparations, larger formats for substantial dishes, and super-thin options that require minimal or no water dipping
- Perfect fresh spring rolls by layering fillings strategically on the lower third of dampened sheets, rolling tightly while tucking in sides, and positioning colorful ingredients near the surface for attractive presentation
- Create crispy fried variations by maintaining oil temperature at exactly 360°F and frying pieces for just 5-10 seconds until golden and puffed, then seasoning immediately while hot
- Explore fusion applications like rice paper pizza (cooked directly in a dry pan with toppings) and homemade noodles (rolled, sliced, and steamed for 25 minutes) to expand beyond traditional Asian preparations
Table of Contents
Introduction
Rice paper is a magical ingredient that is “sold dried in thin, crisp, round sheet form” but transforms into a versatile wrapper for both savory and sweet dishes. However, learning how to cook rice paper can sometimes frustrate beginners who face issues like tearing, stickiness, or over-soaking. Don’t worry—this guide covers everything from essential tools and rehydration techniques (Cold vs. Warm) to creative recipes like Fresh Rolls and Pizza. We recommend Asiadeli Super Thin Rice Paper as the ultimate beginner-friendly choice, as it requires “No Need Dipping in Water,” ensuring a perfect result every time. For more inspiration, explore our Vietnamese rice paper ecosystem.
What Is Rice Paper & Why Use It?
I’ve discovered that rice paper represents one of the most versatile ingredients in Asian cuisine. This thin, translucent wrapper is made from rice flour and water, creating a glutinous yet delicate texture that’s completely edible without any cooking required. The neutral flavor profile makes it an exceptional canvas for both savory dishes featuring meats and vegetables, as well as sweet preparations with fruit or dessert fillings.
Understanding Rice Paper Varieties
Rice paper comes in several distinct forms, each suited for different culinary applications:
- Small round sheets work perfectly for delicate dim sum preparations.
- Larger square formats excel for dishes like gimbugak.
I find that understanding these size variations helps you choose the right wrapper for your specific cooking goals.
Traditional rice paper often presents challenges due to its thick, brittle nature that can crack easily during handling. However, modern innovations like Asiadeli Super Thin Rice Paper have transformed the cooking experience. These rectangle design is specifically engineered for superior flexibility, making them much easier to handle and roll without the frustrating breaks that plague thicker varieties.
Why Choose Rice Paper for Your Cooking
The smooth texture of rice paper provides an ideal foundation for countless recipes. I appreciate how it softens beautifully when moistened, becoming pliable enough for intricate folding techniques while maintaining enough structure to hold fillings securely. This balance makes it perfect for everything from spring roll wrapping to more elaborate presentations.
Rice paper’s ability to transform from a rigid sheet into a flexible wrapper opens up numerous culinary possibilities. You can create Vietnamese fried rice paper rolls that achieve a perfect golden crispiness, or experiment with grilled Vietnamese rice paper for a completely different texture and flavor experience.
The neutral taste means rice paper won’t compete with your carefully balanced seasonings and ingredients. Instead, it enhances the overall dish by providing textural contrast while allowing the filling flavors to shine through completely. This characteristic makes it particularly valuable when working with delicate ingredients where you don’t want the wrapper to overpower the primary components.
Storage convenience adds another layer of appeal to rice paper. Unlike fresh wrappers that require refrigeration and have limited shelf life, dried rice paper can be stored at room temperature for extended periods. This pantry-stable quality makes it an excellent ingredient to keep on hand for impromptu cooking sessions or when you need to quickly prepare appetizers for unexpected guests.
The accessibility of quality rice paper has improved significantly, with options available through various channels. Whether you’re sourcing ingredients locally or exploring wholesale rice paper suppliers, the variety of products ensures you can find the perfect thickness and size for your specific applications.
Working with rice paper also offers health-conscious cooks an attractive option. It’s naturally gluten-free, low in calories, and contains no artificial additives in its pure form. This clean ingredient profile makes it suitable for various dietary restrictions while still delivering the satisfying texture that makes wrapped foods so appealing.
The transformation process from dry sheet to workable wrapper happens quickly with just warm water, making rice paper an efficient choice for both home cooks and professional kitchens. I find this rapid preparation particularly valuable during busy cooking periods when timing is essential.
Essential Tools and Ingredients
I’ve found that having the right equipment makes all the difference when working with rice paper. Your setup should include a shallow dish that’s wider than your rice paper sheets for proper hydration. A flat work surface gives you space to maneuver, while clean kitchen towels help absorb excess moisture. Keep a flexible spatula handy for turning sheets during cooking, and consider using a spray bottle for controlled water application when you need precise hydration levels. Parchment paper prevents sticking issues that can ruin your final dish.
Core Ingredients and Quantities
For successful rice paper cooking, I recommend starting with these fundamental ingredients:
- Rice paper sheets: 5-10 sheets for most recipes
- Oil: 1 cup for deep frying or 1 tablespoon neutral oil for sautéing
- Salt: 1/2 to 1 teaspoon for seasoning
- Sesame oil: 1/2 to 1 tablespoon for authentic flavor enhancement
- Soy sauce: 1 tablespoon for umami depth
The quality of your rice paper sheets directly impacts your results. I prefer using authentic Vietnamese rice papers that offer consistent thickness and flexibility. Fresh sheets work better than older ones that may crack during preparation. When buying rice paper in bulk, store them in a cool, dry place to maintain their integrity.
Temperature control becomes crucial during the cooking process. I keep my oil at medium heat for sautéing and around 350°F for frying. This prevents burning while ensuring proper texture development. Your shallow water dish should contain room temperature water — hot water makes the sheets too soft too quickly, while cold water takes longer for hydration.
Neutral oils like vegetable or canola oil work best for frying since they won’t compete with the rice paper’s subtle flavor. Sesame oil adds an authentic touch but should be used sparingly as its strong flavor can overwhelm delicate preparations. I often mix a small amount of sesame oil with my neutral cooking oil for the perfect balance.
Salt timing matters significantly in rice paper cooking. I season the sheets after they’ve been hydrated but before cooking begins. This allows the salt to penetrate properly without drawing out moisture prematurely. Soy sauce works excellently as both a seasoning and a dipping sauce component.
Your work surface should be completely clean and dry before you begin. I lay out all ingredients and tools within easy reach since rice paper cooking moves quickly once you start. Having everything prepared prevents scrambling for items while your sheets are hydrating or cooking.
Consider investing in a good-quality non-stick pan if you plan to make dishes like grilled rice paper regularly. The smooth surface prevents tearing and makes flipping easier. For fried rice paper preparations, a heavy-bottomed pot maintains consistent oil temperature.
I always keep extra rice paper sheets on hand since beginners often tear a few during the learning process. The sheets are delicate when wet, and having backups prevents frustration during your first attempts. Store opened packages in airtight containers to prevent moisture absorption.
Water quality affects your final results more than most people realize. I use filtered water when possible since chlorinated tap water can sometimes leave an off-taste. The water should be changed if it becomes cloudy or if you’re working with multiple batches.
Your kitchen towels should be lint-free to avoid leaving residue on the rice paper surface. I prefer using paper towels for initial drying and cloth towels for final prep work. This combination gives you both absorbency and cleanliness throughout the cooking process.
Mastering Rehydration: Cold vs. Warm Water
I always recommend starting with the fundamental principle: work with one rice paper sheet at a time. This approach prevents waste and gives you better control over the hydration process. The standard technique involves dipping each sheet into shallow water, gently shaking off any excess, and placing it on a flat surface to rest for several seconds.
Cold Water Technique for Beginners
Cold water remains my top recommendation for anyone starting their rice paper journey. This method significantly reduces the risk of tearing during handling, giving you more time to position fillings properly. The slower softening process allows better control, making it particularly valuable when you’re learning how to wrap spring rolls or preparing Vietnamese fried rice paper rolls. Cold water prevents the sheets from becoming overly sticky, which often frustrates newcomers to rice paper cooking.
Warm Water for Speed and Experience
Experienced cooks often prefer warm water for its efficiency. This method accelerates the softening process, cutting preparation time nearly in half. However, warm water dramatically increases stickiness, making the sheets more challenging to handle. I’ve found that warm water works best when you’re confident in your technique and need to prepare large quantities quickly, such as for grilled Vietnamese rice paper dishes.
The alternative damp towel method offers another viable option. Wrap each sheet in slightly moistened kitchen towels for several seconds until the paper becomes pliable and workable. This technique provides precise moisture control and eliminates the mess associated with water bowls.
Quality matters significantly in rice paper selection. Premium brands like Asiadeli Rice Paper transform the entire process by requiring minimal hydration. These advanced sheets need just a quick 3-second dip or sometimes no water at all, effectively removing the traditional guesswork from rice paper preparation. This innovation particularly benefits busy kitchens where consistency and speed are priorities.
Temperature control extends beyond just the water itself. Room temperature affects how quickly rice paper softens, so adjust your technique accordingly. During warmer months, sheets soften faster, while cooler conditions require slightly longer hydration times. I always test the first sheet to gauge the optimal timing before proceeding with larger batches.
Success with rice paper hydration comes through practice and understanding your specific brand’s characteristics. Different manufacturers produce sheets with varying thickness and composition, affecting hydration requirements. When purchasing rice paper, consider consulting wholesale suppliers who can provide guidance on optimal preparation methods for their specific products.
Method 1: Fresh Rice Paper Rolls (Goi Cuon)
Fresh rice paper rolls showcase the delicate nature of this Vietnamese staple while creating a light, refreshing meal. I’ll guide you through preparing the fillings first, then demonstrate the proper wrapping technique.
Preparing Your Fillings
Start with the protein by cooking 4 eggs on low heat for exactly 1 minute on each side. This gentle cooking method creates silky, tender eggs that won’t overpower your rolls. Let them cool completely before slicing thinly into strips.
Next, prepare your vegetables with these specific techniques:
- Blanch fresh spinach leaves in boiling water for just 1 minute to maintain their vibrant color
- Squeeze out excess water thoroughly and season with a pinch of salt and sesame oil
- Stir-fry julienned carrots on high heat for 1 minute to achieve the perfect crisp-tender texture
- Allow all cooked components to cool to room temperature before assembly
Once your ingredients are ready, soften your spring roll rice paper sheets by dipping them briefly in warm water. The sheets should feel pliable but not overly soft, as they’ll continue to absorb moisture during assembly.
Position your filling strategically on the lower third of the dampened rice paper sheet. Start with lettuce leaves as your base layer, followed by your rice vermicelli, then add the prepared eggs, spinach, and carrots. This layering creates structure and prevents the delicate wrapper from tearing.
Execute the rolling technique by first rolling the bottom edge over the lettuce once. Stop here and carefully tuck in both sides of the rice paper, creating neat edges. Here’s where I recommend the ‘peekaboo trick’ – position your most colorful vegetables like carrots and herbs near the surface so they show through the translucent wrapper, creating an attractive presentation.
Continue rolling tightly but gently, maintaining even pressure throughout. The rice paper will seal itself as you roll, creating a secure package. Proper tension prevents loose rolls while avoiding tears in the delicate wrapper.
For authentic flavor, I recommend using Asiadeli Rice Vermicelli as your core filling. This specific brand provides the ideal texture and subtle taste that complements rather than competes with your fresh ingredients.
Fresh rolls taste best when served immediately, though you can store them covered with damp paper towels for up to 2 hours. Serve with traditional nuoc cham dipping sauce or peanut sauce for the complete Vietnamese experience.
Method 2: Crispy Fried Rice Paper Chips & Gimbugak
I transform ordinary rice paper into crispy, addictive snacks through deep frying, creating both simple chips and the Korean delicacy called Gimbugak. The process requires minimal ingredients but demands precise timing and temperature control.
Making Basic Fried Rice Paper Chips
For quick snacks, I start by cutting rice paper sheets into manageable pieces using kitchen scissors or a sharp knife. Triangle shapes work best for even cooking, though you can experiment with different sizes based on your preference.
Heat oil in a deep pan or wok to exactly 360°F – this temperature ensures the rice paper puffs properly without burning. I use a cooking thermometer to maintain accuracy, as even slight temperature variations affect the final texture.
The frying process happens incredibly fast. I drop the rice paper pieces into the hot oil and watch them transform within 5–10 seconds. They’ll bubble vigorously and expand, turning golden and crispy almost immediately. Remove them quickly using a slotted spoon to prevent overcooking.
Drain the hot chips on paper towels to remove excess oil. While they’re still warm, season them with your choice of toppings:
- Salt for classic simplicity
- Sugar for a sweet twist
- Ramen seasoning powder for savory umami flavor
- Chili powder for heat
- Garlic powder for extra depth
Creating Authentic Gimbugak
Gimbugak elevates fried rice paper by incorporating gim (Korean seaweed sheets). I begin with square rice paper sheets, which provide the best surface area for seaweed attachment.
Spray the rice paper lightly with water – just enough to make it slightly tacky without soaking it completely. Press a sheet of gim firmly onto the moistened surface, ensuring good contact across the entire area.
The drying phase determines the final texture. I let the assembled pieces dry in a shaded area for at least one hour. This partial drying creates the perfect balance between flexibility and crispness. If you accidentally soak the rice paper too much, extend the drying time to a full day.
Frying Gimbugak requires a specific technique. I place the rice paper side down first in the 360°F oil, allowing it to crisp before the seaweed side touches the hot surface. This method prevents the gim from becoming too dark while ensuring the rice paper achieves maximum crispiness.
Watch carefully as the combination fries – the seaweed can burn quickly if left too long. The entire process takes about 10–15 seconds per piece.
Both variations store well in airtight containers once completely cooled. I find they maintain their crispiness for several days, making them perfect for meal prep or entertaining. The versatility of these fried rice paper creations makes them excellent accompaniments to Vietnamese dishes or standalone snacks.
For those interested in exploring other Vietnamese fried rice paper preparations, these crispy variations offer a delightful contrast to traditional fresh spring rolls. The same rice paper that works beautifully for wrapping spring rolls transforms completely through this frying method.
Temperature control remains the most critical factor in achieving consistently crispy results. I keep my thermometer handy throughout the process and adjust heat as needed to maintain 360°F. This attention to temperature detail separates restaurant-quality chips from soggy disappointments.
Method 3: Rice Paper Pizza & Potato Pancakes
Rice paper transforms into exciting fusion dishes that blend Asian techniques with familiar flavors. I’ll show you how to create two innovative recipes that showcase the ingredient’s versatility beyond traditional spring rolls.
Rice Paper Pizza
This crispy Vietnamese-style pizza delivers satisfying textures and bold flavors in minutes. Start by heating a non-stick pan over medium heat and place one sheet of rice paper directly into the dry pan. Fry the sheet for about 30 seconds until it becomes golden and crispy on the bottom.
Once the base crisps up, add a layer of scrambled eggs while they’re still slightly wet – they’ll finish cooking on the hot rice paper. Top with your choice of sliced shallots or onions, then add cooked meat like chicken, pork, or beef. Drizzle soy sauce or oyster sauce over the toppings for umami depth.
Finish by sprinkling shredded cheese over everything and adding a few dashes of Sriracha for heat. The residual heat will melt the cheese perfectly. This technique creates a light, crunchy alternative to traditional pizza that’s ready in under five minutes.
Vietnamese Rice Paper Potato Pancake
This hearty pancake combines Vietnamese rice paper techniques with the comfort of potato dishes. Begin by julienning two medium potatoes into thin matchstick pieces. Season the julienned potatoes with salt and pepper, mixing thoroughly to ensure even distribution.
Prepare your rice paper by briefly dipping one sheet in warm water until it softens slightly – don’t let it get too soggy. Place this damp sheet into a cold, non-stick pan that’s off the heat. Spread your seasoned potato mixture evenly across the rice paper base.
Take a second rice paper sheet, dampen it the same way, and carefully place it on top of the potatoes to create a sandwich. This double-layer technique keeps the filling secure during cooking.
Cover the pan with a lid and turn the heat to high for exactly one minute. This initial burst of heat creates steam that helps cook the potatoes. Then, reduce the heat to low and continue cooking for five more minutes with the lid on.
After a total of six minutes, carefully flip the entire pancake using a large spatula. Add a small amount of oil to the pan and cook on low heat for another five minutes. The total cooking time reaches eleven minutes, creating a golden, crispy exterior with tender potatoes inside.
The key to success lies in timing and temperature control. High heat initially generates steam for cooking, while the extended low-heat period ensures the potatoes cook through without burning the rice paper. This method produces a crisp outer shell that gives way to perfectly cooked, fluffy potatoes.
Both recipes demonstrate how rice paper adapts to different cooking methods beyond the typical fried rice paper rolls or grilled rice paper preparations. The pizza version works best as a quick snack or light meal, while the potato pancake serves as a substantial side dish or vegetarian main course.
For best results with either recipe, use fresh rice paper sheets that haven’t been stored in humid conditions. The sheets should feel dry and crisp before cooking. If you’re planning to make these regularly, consider sourcing quality rice paper from a reliable wholesale supplier for consistent results and better value.
Method 4: Advanced “Cheating” Dumplings & Noodles
Rice paper transforms into exceptional dumpling wrappers and noodles with these innovative techniques. I’ll show you how to create restaurant-quality results using simple methods that bypass traditional preparation.
Creating Rice Paper Dumplings
Start by preparing your filling with finely chopped cabbage, julienned carrots, minced garlic, fresh ginger, and sliced mushrooms. Season this mixture generously with soy sauce and sesame oil for authentic Asian flavors. The key lies in removing excess moisture from your vegetables before wrapping – pat the cabbage dry with paper towels after salting it briefly.
Dampen your rice paper sheet just enough to make it pliable. Place 2-3 tablespoons of filling in the center, then fold using the dim sum technique:
- Bring one half over the filling
- Fold in the sides
- Roll until sealed
This creates a secure package that won’t burst during cooking.
Steam your dumplings for 5 minutes in a covered steamer basket, or boil them gently in salted water until they float. The rice paper becomes translucent and tender while maintaining its structural integrity. These dumplings pair beautifully with dipping sauces made from soy sauce, rice vinegar, and chili oil.
The “Cheating” Rice Paper Noodle Technique
This method produces fresh noodles without specialized equipment or complex preparation. Begin by lightly dampening a single sheet of rice paper until it becomes flexible but not soggy. Brush one side with a thin layer of neutral oil to prevent sticking during the rolling process.
Roll the sheet tightly from one edge, creating a compact cylinder. Use a sharp knife to slice the roll into strips of your desired width:
- Thin strips for delicate noodles
- Wider cuts for hearty, udon-style strands
Carefully unroll each strip using chopsticks or your fingers, handling them gently to avoid tearing.
Place the unrolled noodle strips in your rice cooker with a small amount of water and steam for 25 minutes. This extended steaming time ensures the noodles cook through completely while developing the perfect chewy texture. The result mimics fresh rice noodles found in Vietnamese pho or pad thai.
These homemade rice paper noodles work exceptionally well in:
- Stir-fries
- Soups
- Cold salad preparations
Toss them with vegetables, proteins, and your favorite Asian sauces for quick weeknight meals. The technique scales easily — make larger batches by processing multiple sheets simultaneously.
Both methods showcase rice paper’s versatility beyond traditional spring roll applications. You can experiment with different fillings for dumplings, incorporating ingredients like ground pork, shrimp, or tofu for protein variations. Similarly, the noodle technique adapts to different thickness preferences and cooking methods.
Storage Tips:
- Store leftover dumplings in the refrigerator for up to 2 days and reheat by steaming briefly.
- Fresh rice paper noodles should be used immediately for best texture, though you can prep them a few hours ahead if kept covered and slightly moist.
These advanced techniques demonstrate how rice paper adapts to creative culinary applications while maintaining its essential characteristics. Master these methods to expand your cooking repertoire with authentic Asian-inspired dishes that impress both family and guests.
Want to Buy Rice Paper That Doesn’t Break?
I’ve tried countless rice paper brands over the years, and nothing frustrates me more than sheets that crack or tear during preparation. That’s why I recommend Asiadeli’s Super Thin Rice Paper (No Need Dipping) for both beginners learning how to wrap spring rolls and professional chefs who demand consistency.
This particular rice paper stands out because of its exceptional elasticity. You won’t experience the brittle texture that plagues many inferior products. The super-thin design eliminates the need for lengthy soaking or dipping, which saves time and reduces the chance of oversaturating your sheets.
Key Features That Make the Difference
- Non-GMO composition ensures you’re working with pure ingredients
- Gluten-free formulation accommodates various dietary requirements
- Superior flexibility prevents cracking during rolling and folding
- Consistent thickness across each sheet for uniform cooking results
The versatility impresses me most. I use these sheets for fresh summer rolls, fried spring rolls, and even sashimi presentations. The thin profile creates delicate textures perfect for raw applications, while maintaining enough strength for deep frying without breaking apart.
Professional kitchens benefit from Asiadeli’s wholesale options and mix container availability for global export. This flexibility allows restaurants to maintain consistent inventory without compromising quality. I’ve seen too many establishments struggle with unreliable suppliers who can’t deliver premium rice paper consistently.
For those interested in exploring different rice paper cooking methods, this product works excellently for grilled preparations as well. The elasticity prevents tearing when exposed to direct heat, something I can’t say about thicker, less flexible alternatives.
If you’re considering bulk purchases, I recommend reaching out to Asiadeli directly.
The difference between quality rice paper and inferior products becomes apparent the moment you start working with them. Asiadeli’s Super Thin Rice Paper eliminates the guesswork and frustration, delivering consistent results whether you’re preparing a single appetizer or feeding hundreds of guests.
Sources:
YouTube – “8 Ways To Enjoy Rice Paper”
Siam Recipes – “What is Rice Paper and How to Use It for Home Cooking”
YouTube – “Super Crispy Easy Rice Paper Rolls”
YouTube – “8 Viral Rice Paper Recipes”
YouTube – “How To Make Perfect Rice Paper Rolls At Home”
The Nessy Kitchen – “15 Tasty Rice Paper Recipes: Rolls and Beyond”
Forks Over Knives – “Ingredient IQ: Rice Paper Wrappers”
